
In this movie, the VFX Artist used texture maps to animate mesh particles using vertex shaders in this 7000 Salmon Particle system:
FX Vertex Animation Baker
Intro:
The vertex animation Baker is a tool created to
export animated vertex positions into a texture map which can then be
read by the Editor. This comes from a GDC Talk from Naughty Dog's Andrew
Maximov. The idea is that simple vertex animations can be done in the
Vertex shader on the GPU much faster than those done through bones and
skinning. This gives us the ability to animate things like background
characters, creatures, insects, and large schools of salmon at a relatively
low cost-- These can even be done as mesh particles, and controlled by
particle emitters.
---------------------------------------------------------------------------------------------------------------
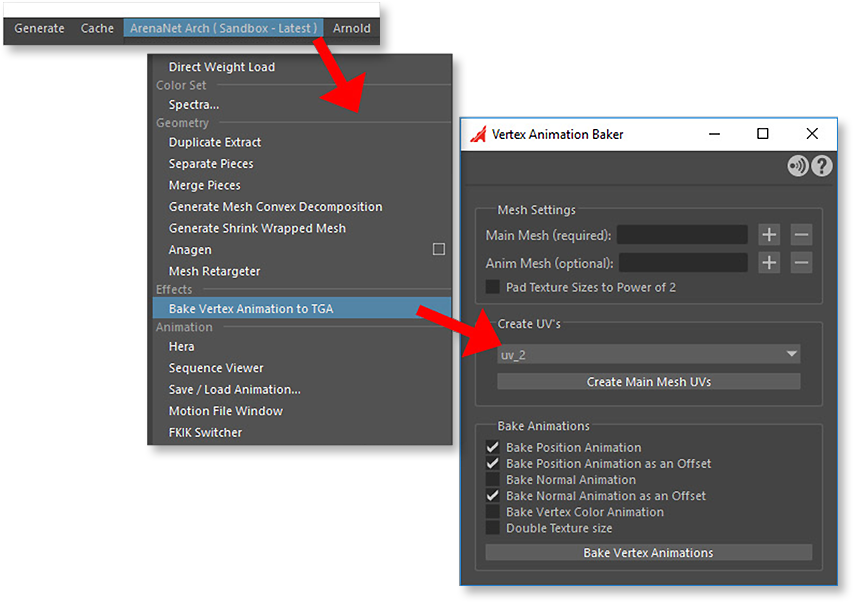
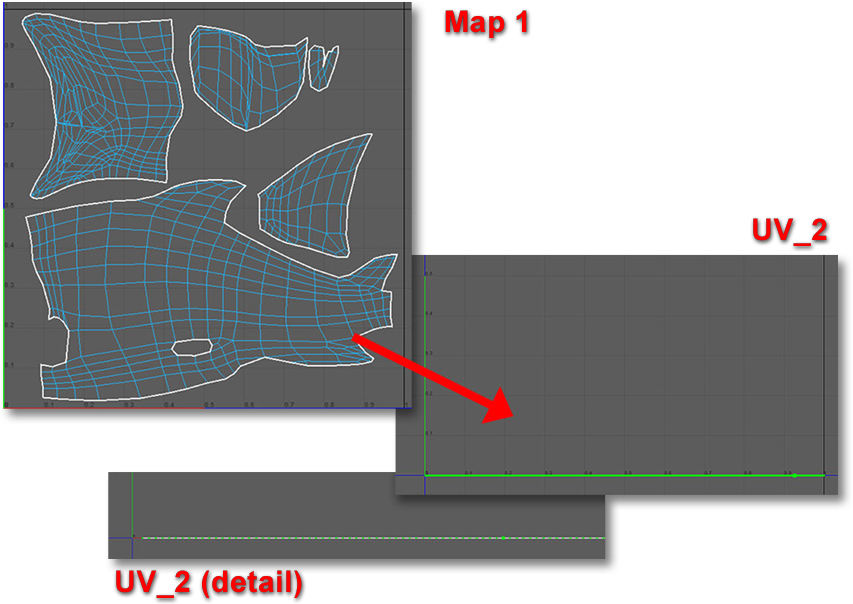
Create Main Mesh UV's:
Whatever model you export from Maya (the Main Mesh) will have to have a special UV set that can be read by the arch editor. Arch will currently only accept uv_0 through 8. (Note: The Arch engine currently won't accept gaps between uv set numbers, like using uv_0 and uv_2 while skipping uv_1.)
The "Create Main Mesh UV's" button will copy the UV's from the
mesh's Map1 UV's to a new UV set selected from uv_0 through uv_7 (the
current default is uv_2). It arranges the U values of the vertices by
index, one vert per pixel, from 0 to 1 on the texture map. All the V values
are set to 0.
---------------------------------------------------------------------------------------------------------------
Bake Vertex Animations:
The bake vertex animations creates texture maps with position offsets, and normal offsets in Maya's worldspace. The texture maps are arranged so the number horizontal pixels represents the number of vertices (+1 information pixel), and the number of vertical pixels represents the number of frames in whatever animation you are baking (the current range on the timeline +1 information pixel). The Salmon pictured above has 1214 vertices and is a 32 frame animation. The color information below is RGB = XYZ positions. 128,128,128 is 0,0,0.
Position Map Example (Sockeye Salmon, scaled down from 1214 width to fit
screen):
![]()
Normal Map Example (Sockeye Salmon, scaled down from 1214 width to fit screen):
![]()
The VFX artist used the above texture maps to drive the animation for this mesh using Materials:
---------------------------------------------------------------------------------------------------------------
Tool Details:
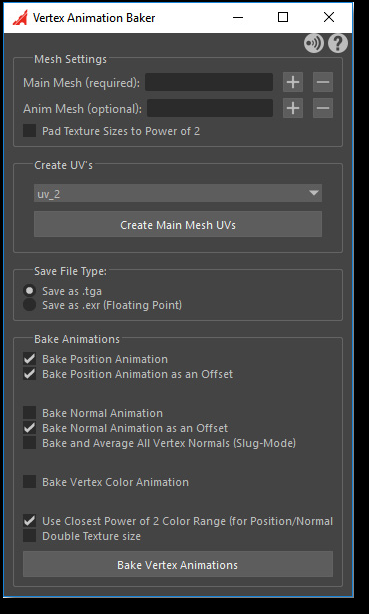
Main Mesh Settings:
Main Mesh Settings: Main Mesh (required): this will be the mesh you export to the editor. It will require an extra UV map to drive the vertices. Use the plus button to add the selected mesh, use the minus to clear.
Animation Mesh (this is optional):
You can use your main mesh as a bindpose, and create animation data
that offsets the vertex positions/normals from the main mesh's origianal
position and normals. Use the plus button to add the selected mesh, use
the minus to clear.
Pad Texture Sizes to Power of 2: This
will add extra pixels to your texture maps to increase their texture size
to a power of two, in case it is required by arch. This is factored into
generating UV coordinates as well.
-------------------------------------------------------------------
Create UV Settings:
UV dropdown: choose between 0 through 7. Make sure there are no empty uv_ sets between UV_0 and the one you are using or the editor won't like it.
Create Main Mesh UV's:
Button to generate the new UV set on the main mesh.
-------------------------------------------------------------------
Save
File Type:
Save as .tga:
Save animation data in targa format.
Save as .exr: Save animation data as normalized floating point exr file, 16-bit.
-------------------------------------------------------------------
Bake
Animations :
Bake Position Animation: if checked
will create a position map.
Bake Position Animation as an Offset:
if checked and you are not using an animation mesh, the position map's
values will be offset distances from the position values on the first
frame (this is more accurate when checked, as the values are smaller).
Otherwise, the positions will be from 0,0,0.
Bake Normal Animation: if checked,
will create a normal map.
Bake Normal Animation as an Offset:
If checked and you are not using an animation mesh, the normal map's values
will be offset vector values from the normal values on the first frame
(this is more accurate when checked, as the values are smaller). Otherwise,
the normals will be from 0,0,0.
Bake and Average All Vertex Normals (Slug-Mode):
It was found that the command for getting Normals using Maya's API was
returning ( 0, 1, 0 ) for any vertex's average of normals, instead of
the actual average, especially if the normals have been combed. This checkbox
uses the pymel command and manually averages the normals. on a vertex-
much slower, but more accurate.
Bake Vertex Color Animation: if checked,
will create a map of vertex colors over time. Can be used to drive shaders
and blend between texture maps/normal maps in the engine.
Use Closest Power of 2 Color Range: If
this is checked, the total range of position values (as distance from
zero in centimeters) is rounded up to a power of two exponent. The exponent
is stored in the Blue value of the pixel in the upper right hand corner.
Blue 0 = 1 cm, Blue 1 = 2 cm, Blue 2 = 4 cm, Blue 3 = 6, ... Blue 6 =
64, Blue 7= 128, Blue 8 = 256 cm... etc. Otherwise the colors are scaled
to the maximum distance from zero and the upper right hand pixel will
be Bright Red.
Double Texture Size: While writing the texture, this will double each pixel horizontally and vertically. Just in case there are accuracy errors reading in the editor.
Bake Vertex Animations: Create Your Vertex Animation Targa maps as indicated above.
After pushing the button, you will immediately be prompted to put in filenames and locations for your position map and your normal map- this is done upfront so you don't have to babysit your render if you are doing both texture maps.
On Bringing the texture maps into the editor, they must be UNCOMPRESSED- at least if exporting position info.
Now... If I'd known that the lead VFX artist was going to do THIS with the tool, I never would've wrote it for him: